
Taking Mosaic Images
Mosaics are large, usually wide-field, images stitched together from several smaller images. The reasons for creating mosaics include obtaining a wider field of view with a small CCD and/or long-focal-length scope, and making larger image files for creating larger, more detailed images and prints.
There are two major steps involved in creating mosaic images. The first is actually taking the images, and the second is putting those images together. The first part is covered in detail below. The second part is given an overview, while detailed steps for creating a mosaic are discussed in the Software Instructions section on Making Mosaics with Adobe Photoshop.
Taking Mosaic Images
A lot of work can go into a mosaic. In some cases only two images are used, but often many more will be combined to create the final image. Each image in turn will be a composite of multiple images just like any other CCD image, and of course tri-color imaging requires three times as much work! A four-image, LRGB mosaic might actually require dozens or even hundreds of individual exposures! Be glad that CCDs are so sensitive! In the end the effort is well worth it when you see the final composite come together to create a beautiful (and large) image.
Planning the Image
This step is important, especially in the case of mosaics involving more than two or three frames. In the case of a simple two-frame mosaic of, say, the Andromeda Galaxy, it may be sufficient to place the core of the galaxy just inside the left edge of one image and just inside the right edge of the other.
Tip: Make sure there is enough overlap between images to properly align them later, usually about 10-20%.
When planning mosaics with 4 or 6 or even more images, the use of software is almost essential. Using programs such as Starry Night or The Sky to lay out the mosaic beforehand makes life a lot easier once you get to the telescope. Use the field of view indicator option to determine what you should see in each image in order to connect them all later. Again, be sure to account for overlap. Desktop Universe (since incorporated into Starry Night Pro Plus) has a particularly good field of view indicator function and it is used for the examples below. For self-guiding SBIG CCD cameras, this function can be used to help select guide stars as well.
An Example
The example below is of a mosaic taken of the Rosette Nebula. A 6-image mosaic was captured and Desktop Universe was used to determine the positions for the individual frames and to select the proper orientation to find a suitable guide star. Finding a guide star was a critical aspect of taking this image as it was done using an H-alpha filter which severely limits the choice of guide stars as most are too faint to appear in even a 10 or 20-second guide exposure.
Begin by determining the field of view for the CCD camera. Most planetarium programs will do this automatically. For this example, an ST-10XME CCD camera was used on a 6" f/9 refractor to image the Rosette Nebula in Monoceros. The field of view for a single image will be about 38' x 25'. The camera was oriented with the long axis of the CCD north and south, the typical arrangement on a German equatorial mount. If the field of view is doubled in the long direction and tripled in the short axis, the field of view would be 76' x 75'. However, remember that the final mosaic will be smaller than this due to the necessary overlap between images for alignment. The image below shows a 65' x 65' field of view overlaid on the target.

Above: The final mosaic field of view showing how the target will be framed.
Now, charts can be created showing the six separate images which will later be combined. Note the stars along the right edge and bottom edge of the upper left frame and be sure those stars are also in the upper right and lower left frames, respectively.

Above: Field of view indicator for the lower left frame of the mosaic. Note the two fairly bright stars near the right edge of the image. These reference stars will be used to determine the overlap for the lower middle frame.

Above: The lower middle frame of the mosaic. Notice the two reference stars from above are still within the field of view, allowing for easy alignment of the images later.
The same procedure is repeated for the remaining lower frame and then the top row of images, making sure to overlap stars along the top of each frame with the image above it and along the left and right edges of the bottom frames so they overlap each other.

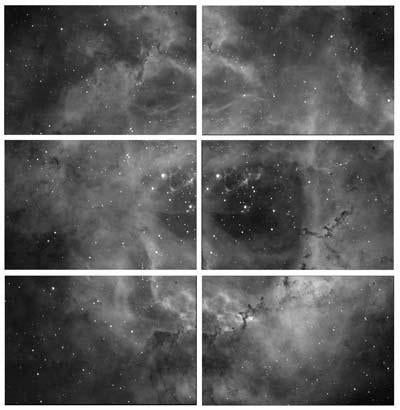
Above: The six individual frames for the mosaic. Note the overlapping areas of the frames.

Above: The final 6-image mosaic of the Rosette Nebula. Click image for larger view.
Super-Wide Tricks
This procedure works well, but starts to break down when using wide-angle lenses to image very extensive portions of the sky. Since the sky is effectively spherical (and not flat) there is some distortion introduced when imaging very wide fields. Over relatively small wide fields (say, 2 or 3 degrees) this is negligible. When shooting wider fields of view using large CCDs and wide-angle camera lenses there are some tricks to getting the frames to properly overlap.
Even medium-field mosaics are affected, as the following example shows. Suppose you wish to image the vast expanses of nebulosity in Cygnus using an ST-10XME and 70mm camera lens. This setup gives a field of view of 12.2° x 8.2°. A simple two-frame mosaic is all that is required to capture the primary nebulae (the North American Nebula and Gamma Cygni Nebula). Using the technique from above, the following chart is generated for the right frame.

Above: Right frame of the Cygnus mosaic.
Note two objects: the orange star star 47 Cygni just left of the lower left corner of the CCD field of view and the small nebula Sh2-115 in the upper left hand corner of the frame.

Above: Left frame of the Cygnus mosaic.
This frame was selected by using the nebula Sh2-115 to determine the overlap. The nebula was in the upper left corner of the first frame and so is placed in the upper right corner of this second frame. However, note that the orange star 47 Cygni is still outside the frame, now to the lower right. This means the top corner of the frames are overlapping, but the lower right corner of this frame will not overlap the lower left corner of the first frame.
When aligning wide-field mosaic frames, always overlap the corner of the frame closest to the celestial equator. In this case, overlapping the bottom left corner of the first frame with the bottom right corner of the second frame would result in the two images overlapping along the full height of the images. In the case of an image below the celestial equator (say, in Sagittarius), the reverse would be true. In general:
For wide-field mosaics north of the celestial equator, align the southern parts of the frames.
For wide-field mosaics south of the celestial equator, align the northern parts of the frames.
Putting the Mosaic Together
For specific information on using Adobe Photoshop to create CCD mosaics, visit the Software Instructions section on Making Mosaics.
The basics of piecing together mosaics involve:
-
Aligning the individual images
-
Compositing them
-
Adjusting the brightness, contrast, and color so that each frame matches the others
Tip: It is best to leave the individual CCD images mostly unprocessed. Some adjustments can be made such as stretching, etc., but adjustments to contrast and color should be left until the mosaic is combined.

Above: Four images for a mosaic of the Cone Nebula. From left to right they are the upper left, lower left, lower right, and upper left frames. Notice there are some slight differences in color and brightness which will be adjusted later.
Aligning Images
Aligning can be done manually in programs like Photoshop, or can be automated using software like MaxIm DL. Scaling is generally not necessary if each image was taken using the same setup, but rotation and shifting is required. For very wide-angle images, there may be some scaling or stretching required to compensate for the distortion inherent due to the curvature of the sky. This is best done with automated software like Registar that finds and aligns common stars in each image.
Once each image is aligned it should be saved as a separate file to avoid having to realign the images if you decide to start over.
Overlaying Images
Using software such as Photoshop, a large blank image is created. Be sure this image is large enough to hold all the mosaic frames with room to spare. This final image will be cropped later.
Each aligned image is copied and pasted into the blank canvas, usually one at a time. The first frame is used as a reference and is placed in its final position in the image. The second frame is placed into the image and the opacity is lowered to make this frame transparent. This frame is then moved into place over the reference frame, an easy task if the images are aligned before hand. The opacity is returned to 100% and the process continues until all the images are in place.

Above: A mosaic frame being shifted into position over a reference frame. The bottom frame has its opacity reduced to 50% so that the offset stars are easily seen. The image is shifted until the stars line up, then the opacity is returned to 100%.
Each image should be kept in a separate layer to later facilitate adjustments to brightness and color.
Matching Images
Once the images are aligned and overlaid, they need to be matched for brightness and color variations.

Above: The four frames aligned and overlaid. If the upper right image is taken as the reference frame, notice that the lower right is too light, and the left two frames are off in color balance (top is too magenta and bottom is too red).
It is usually best to match brightness and contrast settings first and then adjust color balance later. In some programs like Photoshop there are more advanced adjustments which can be made as well. Once the individual frames are matched the image can be flattened into a single layer and overall enhancements can be made.

Above: The finished mosaic of the Cone Nebula.