
Creating A Dynamic-Range Mask
The following is a simple procedure which can be used to enhance faint detail in an image while preserving detail within bright regions of an image. This is particularly useful for bright nebulae (such as Orion or the Swan) or galaxies with bright cores.
How it Works
Many astronomical targets have an extreme dynamic range, consisting of both very bright and very faint parts. Normally it is not possible to display the entire range of brightness on a monitor. Usually the bright parts of the image are overexposed, or the dim regions left invisible. Using logarithmic scaling functions in a program like MaxIm DL can compress the bright and dim regions into a smaller range making it possible to display both parts at the same time.
Some objects have such an extreme range, however, that log scaling alone is not enough. This is where the Dynamic Range Mask is ideal. From a single image, two versions are created. One shows the bright regions of the object, the other shows the faint parts. By combining the two, the entire dynamic range becomes visible. Photoshop makes this process simple.
Creating the Images
Start by opening the calibrated (and stacked) version of an image in your CCD imaging software. Use the log scale command to compress the dynamic range as much as possible. This was done in MaxIm DL for the image of the Lagoon Nebula below. Then adjust the display settings (Screen Stretch in MaxIm) to display only the bright parts of the image (making the faint areas invisible). Save this as one image (M8_bright, for example). Then adjust the display to overexpose the bright areas but show the very faintest detail in the image. Save this as a second file (M8_faint). Then open these two new files in Photoshop.
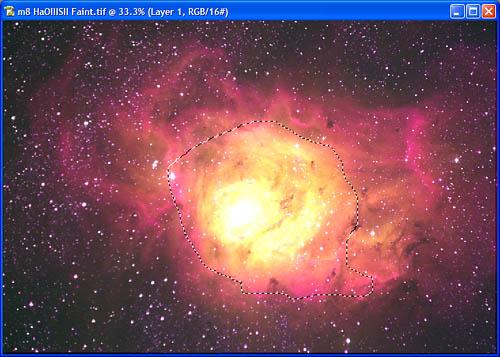
The image below of the Lagoon Nebula is a narrowband RGB consisting of 3x3 minute exposures through H-alpha, OIII, and SII filters.


Above: Bright and dim regions of the Lagoon Nebula
Note that these are not two separate exposures, just different ways of displaying the same image.
Combining the Images
Begin by copying the image of the bright regions (the left image above) into the image of the faint parts as a new layer. Press Ctrl-A in the first image to select the entire image, then Ctrl-C to copy. Click on the second image and press Ctrl-V to paste. Since the images were created from a single original picture, the two layers will line up exactly if you copy using this method.

Above: Layers window with the two images stacked.
Selecting the Overexposed Region
The next step is to draw a selection around the overexposed parts of the bottom layer. In the end, the washed out bright areas will be covered up by the properly displayed bright areas from the top layer.
Leave the top layer active, but click on the eye icon at the left to render it invisible.

Above: Hide the top layer to see the bottom one, but leave the top layer active
Now you will see the overexposed region you want to select, but the selection will exist in the active (invisible) layer.
Use the Lasso Tool (keyboard shortcut L) to draw the selection.

When you draw the selection, draw outside the very brightest areas. Some experience is necessary to know what works best. Look for areas that are not only washed out, but also areas of very high color saturation, which are usually undesirable in a final image.

Above: Overexposed area selected with the Lasso tool
Next, you need to feather the selection to smooth out the transition between the images. Go to Select > Feather. The amount of feathering will depend on the size of the original image. In this case, the image is 2184x1472 pixels. The feathering amount was set to 200 pixels. For a small CCD image (640x480), use about 50-75 pixels, and for a very large image (4008x2672) use around 300-400 pixels as starting points.
Applying the Layer Mask
Click the eye icon next to the top layer to render it visible again. Then click on the Add Layer Mask button (second button at bottom of Layer window) or select Layer > Add Layer Mask from the top menu.

This creates a gradient layer mask from the feathered selection. Areas of the top layer covered by the black part of the layer mask will be hidden, while the areas of the layer below will show through. This results in the image below, where both bright and dark regions are visible.

Above: Blended image showing entire dynamic range in one picture
Flatten the image (Layers > Flatten Image or select Flatten Image from the Layers window menu). You can continue processing as you normally would to get your final image.

Above: Final processed image. Click for larger image.