
Color Imaging
It is recommended that you spend some time taking black and white exposures to learn the basics of focusing, finding, and capturing images. Once you have these techniques down you are ready to start taking images in full color! For a discussion of "real color" as it relates to astronomical images, see the Advanced Theory section.
Note: For many CCD cameras, an optional color filter wheel is necessary for color imaging. More and more CCD cameras, however, are using one-shot color chips that do not require filter wheels.
Single-Shot Color vs. Tri-Color Imaging
Most astronomical CCDs are inherently black and white. Getting a color image requires taking three exposures, one each through red, green, and blue colored filters. These images are then combined using software to create a color image.
Some cameras, however, use a CCD in which the array is divided into red, green, and blue-sensitive pixels. This allows a color image to be taken with a single exposure. This is a similar system to that used in digital cameras and camcorders. The obvious advantage to these systems is the reduced hassle of taking and then processing so many images.
However, there are several disadvantages to these single-shot-color systems as well. First is a reduced sensitivity, meaning that although three times fewer exposures need be taken than with a tri-color system, the exposures must be longer to compensate for the lower sensitivity. Second, more advanced imagers often wish to use other techniques such as LRGB imaging to capture greater detail. These techniques work best with an inherently black and white CCD. Also, using other filters, such as Hydrogen-Alpha or Oxygen-III filters, can be used with black and white systems to yield amazing results.
Note: LRGB imaging as well as the use of other filters is covered under the Advanced CCD Imaging section.
Taking a Tri-Color CCD Image
Start simple. Begin by taking a single exposure through the each of the red, green, and blue filters of your camera's color filter wheel.

Above: Three images of the Trifid Nebula. The left image is through a red filter, the center through green, and the right through blue. Each image is black and white, but will create a single color image when combined. Notice that each filter passes light from a different portion of the nebula, meaning different parts of the nebula are emitting (or reflecting) different wavelengths of light.

Above: After combining the individual red, green, and blue images a full-color image is created.
The next step is to take multiple exposures in each color to reduce noise in the image just as we did for black and white images. For example, you might take six exposures through each filter for a total of 18 shots. Be sure to visit the Basics of Image Processing section to see how the individual red, green, and blue files are combined to create a color image.
One-Shot Color Cameras
One-shot color cameras are becoming more and more popular. These cameras allow a color image to be taken without using separate red, green, and blue filters. This is done by splitting the pixels into red, green, and blue components using a Bayer matrix. A full color image is then interpolated from this matrix. This is the same thing that takes place in a regular digital camera. For most color CCD cameras, however, one extra step is necessary. The image initially downloads in black and white, and must be converted to color. Conversion in normally a one-step procedure, at least once the initial settings have been made.

Above: A one-shot color image of M27 before color conversion. Notice the matrix lines in the image.
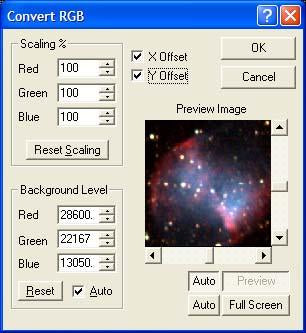
Your CCD image processing software will have a command to convert a one-shot color image from black and white to color. However, each camera converts color in a different way, so settings may need to be changed. For example, using MaxIm DL's Convert RGB command results in the wrong colors being applied if the default settings are used (at least with the camera in this example).

Above: The default Convert RGB settings in MaxIm DL yield incorrect colors with this particular camera.
By changing the settings--in this case, checking both X and Y Offset boxes--the proper nebula colors are obtained.

Above: Using the X and Y Offset check boxes gives the correct colors for the object.

Above: Final one-shot color image of M27. Exposure was a single, unguided 120-second shot from a light-polluted site. Ah, the wonders of technology!