
Taking Images with HyperStar
If you've done much reading on CCD imaging, in books or even on this website, you might have been intimidated by all the steps required to take astrophotos. HyperStar makes imaging so fast and easy that most of these steps are no longer required. If you've been hesitant to image because you felt overwhelmed by the task, get ready to start taking great deep-sky photos on your first night.
What You Need to Do- Install the HyperStar and Camera
- Align the Telescope's Goto Computer
- Focus
- Send the Telescope to an Object
- Take an Automatic Sequence of Images
What You DON'T Need to Do
- Mount the Telescope on a Wedge
- Align a Guidescope or Off-Axis Guider
- Find a Guide Star
- Calibrate the Autoguider
- Take Red, Green, and Blue Filtered Images
- Take Dark Frames
- Take Flat Field Images
Plus, capturing images is 30 times faster than at f/10 and 12 times faster than at f/6.3. What's not to like?
A Night Out with the HyperStar
Below is an overview of the steps you would take to capture images with the HyperStar and a typical imaging setup, including a one-shot-color CCD camera and an alt-azimuth goto Schmidt-Cassegrain telescope. This is the recommended setup for beginners and intermediate imagers, and is by far the most common configuration.
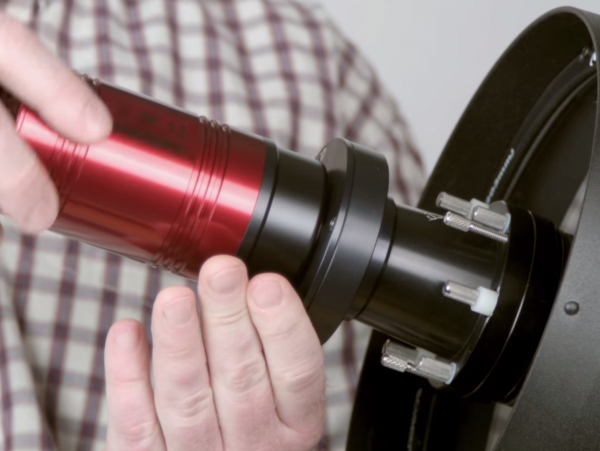
Installing the HyperStar Lens and Camera

This step is quick and requires no tools. A counterweight, included with the HyperStar lens, is installed at the back of the telescope to balance the weight of the HyperStar and camera. The secondary mirror is easily removed from the corrector plate at the front of the telescope and placed into a holder for protection. The HyperStar lens is then threaded onto the front of the telescope in place of the secondary mirror. The CCD camera is threaded onto the HyperStar. If desired, the orientation of the camera can be changed.
Align the Telescope's Goto Computer
With the HyperStar installed, alignment is done exactly as it would be normally--with one small change. Instead of looking through an eyepiece to center the alignment stars, you simply watch the image on the computer screen. The camera is run in a low-resolution mode that takes and downloads a new image every second or two. In this way you get an almost real-time view of where the telescope is pointing. Some camera control programs like MaxIm DL have a function that will overlay crosshairs on the image so you can accurately center an object.
Focus
Focusing with HyperStar is easy and can be done manually or automatically. With a manual focuser, a star is selected in the image and the software displays information on the size of the star. The closer the telescope is to focus, the smaller the star will be. Turn the focus knob to minimize the size of the star and you are set to go.
An autofocuser works the same way only it does all the work for you. This makes the process much faster. When focusing by hand you have to wait after each adjustment for any vibrations to stop. You also need to estimate the average size of the star from several readings because the value shifts slightly due to atmospheric turbulence. The motorized autofocuser is hands free, eliminating vibration. The computer can certainly do calculations faster than you can. Plus, the autofocuser builds a profile for your setup and has a better idea how much to move the focuser to get from the current position to the correct focus position. Manually focusing normally takes about 10 to 15 minutes. Autofocusing takes only 30 to 60 seconds!
Send the Telescope to an Object

Finding objects is easy. With the camera in a low-resolution "finder" mode, it takes images every second or two and downloads them continuously to the computer screen. With just a 1-second exposure, HyperStar is sensitive enough to allow the camera to pick up almost any deep sky object. Above is a 1-second image of the Orion Nebula. In the case of an extremely faint target like the Horsehead Nebula, the exposure may have to be increased to 5 seconds. Compare this to the days of film photography when you couldn't see the Horsehead Nebula through the camera at all. You had to hope you had the scope in the right spot before taking a one-hour exposure!
Once the object has been located by the telescope, you can frame it as desired both by moving the telescope with the directional buttons on the hand control and by rotating the camera using the HyperStar lens adjustments.
Take an Automatic Sequence of Images
Now you let the software do the rest of the work. An automatic sequence will capture however many images you specify and will automatically save them. You simply tell the software the name of the object and the folder in which to store the files, then set the desired exposure time and number of exposures to take. For example, a typical sequence might capture twenty 30-second exposures of the Whirlpool Galaxy. The files would be automatically saved as Whirlpool Galaxy-001, Whirlpool Galaxy-002, etc.
Once the sequence is finished, you simply find another object and repeat the procedure. Capturing hundreds of individual exposures in just a couple hours is no big deal.

Above: A 27-image sequence of 30-second exposures was used to capture this image of the Whirlpool Galaxy