
HyperStar Instructions
The most common setup for HyperStar imaging uses a Celestron CPC-800 or CPC-1100 goto telescope, a Starlight Xpress SXVF-H9C one-shot color CCD camera, MicroTouch autofocuser, and MaxIm DL/CCD software. The popularity of this configuration is due to the extreme ease of use. There is no need for an equatorial wedge, polar alignment, guiding, filtered images, dark frames or flat fields. In fact, it renders about half of the entire Guide to CCD Imaging website obsolete because there are so many aspects of setting up, imaging, and processing that no longer need to be done!
Many users of this setup have requested a step-by-step set of instructions. One of the great things about this setup is that there is a definite routine to capturing images. You will find that you repeat the same steps each time you capture a new image, and soon you will be doing everything automatically (which is handy at three in the morning when your brain has ceased to function properly). Until you've got things down, print out this HyperStar Imaging Quick Reference to take into the field with you.
If you are using this setup with an equatorial wedge, go to this page.
Note: Much of these instructions apply for any HyperStar setup
Below are the instructions for setting up the telescope. The section afterwards shows how to Process HyperStar Images.
Outline of Procedure- Install HyperStar Lens and Camera
- Align Telescope
- Find Target
- Focus Telescope
- Setup Imaging Sequence
- Capture Images
- Process Images
- Position telescope with the nose up at a 45° angle, lock clutch
- Attach the counterweight to the 1.25" visual back
- Remove the secondary mirror and place into its holder
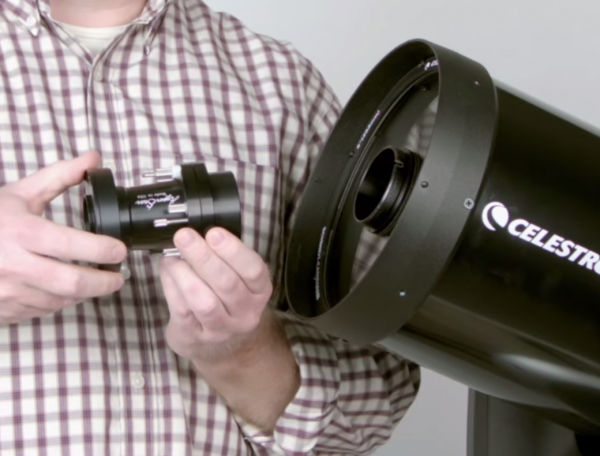
- Thread HyperStar lens onto the front of the telescope
- Remove 1.25" nosepiece from camera and thread camera onto the HyperStar lens
- Loosen screws with white washers on HyperStar and orient camera as desired, tighten screws
- Attach power and USB cables to the camera
- Plug USB into computer and power into outlet or battery (always do this after attaching cables to camera)
- Tie off cables to the handle on fork arm, leaving enough slack for scope movement
- Loosen altitude clutch to check balance, slide counterweight in or out as needed, lock clutch
- Turn on telescope and computer
- Launch MaxIm DL software
- Open Camera Control window and select Setup tab
- Connect to camera
- Select Focus tab, set Seconds to 1.0, Binning to 3, and make sure Continuous is checked
- Start Focus
- Use the MicroTouch hand control to roughly focus the telescope manually
- Right click on the image and select Crosshairs to display a set of crosshairs for centering alignment stars
-
On the CPC hand control, select SkyAlign to begin alignment
-
Point the telescope to the first alignment star
-
Align the star using the finderscope, press Enter
-
Center the alignment star on the crosshairs in MaxIm DL, press Align
-
Repeat for the second and third alignment stars
Find Target
-
Use the CPC hand control to select an object to image
-
Frame the object as desired in the focus window in MaxIm DL
-
Stop Focus
Focus Telescope
This assumes you have already run the initial setup in FocusMax to build a V-curve. If not, see the MicroTouch autofocuser instructions. If you do not have the autofocuser and are focusing manually, see the page on Focusing with MaxIm DL.
-
Launch FocusMax software
-
Press Focus button
-
Watch the magic
-
FWHM value after focusing will usually be 1.5-2.5, depending on seeing conditions
-
If the focus procedure does not seem to work correctly, you may need to find a brighter star than is in the frame, then move back to the object
-
Close FocusMax and resize MaxIm DL window to full screen
Setup Imaging Sequence and Capture Images
-
Select Sequence tab in the Camera Control window
-
Type in a name for the file (usually just the name of the object)
-
Select Set Destination Path under Options and choose or create a folder to put the images in (usually named after the current date)
-
Select Setup Sequence under Options
-
Choose the desired exposure time and number of exposures (30 seconds and 10-30 exposures is common)
-
Start Sequence
-
Have a snack. Enjoy being under the stars. Ponder the mysteries of life, the universe, and everything.
Repeat Imaging Procedure
-
Start Focus in MaxIm DL again
-
Select new target with CPC hand control
-
Frame object as desired
-
It is recommended to run FocusMax on each new object
-
Choose new file name in Sequence and reset Start at to 1
-
Begin new sequence
-
Repeat until the sun rises